Government Property Portal guides
Guidance to help agencies maintain their portfolio data in the Government Property Portal.
Using the portal
Home page
The homepage provides quick access to your key tasks, portfolio metrics, favourites, and modules. Use the tips and guidance below to understand the layout and how to navigate the different dashboards.
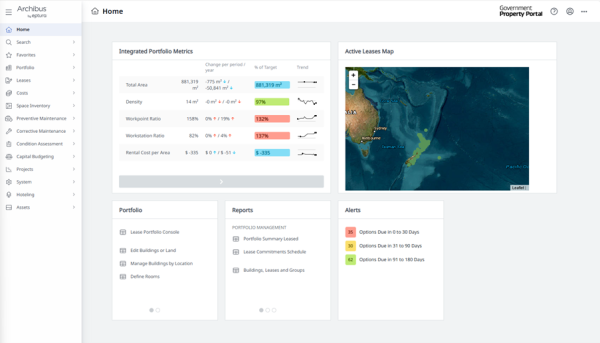
Dashboard view of the Government Property Portal home screen.
Integrated portfolio metrics
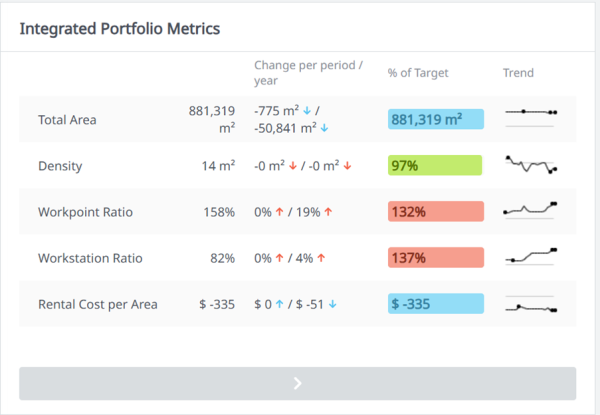
This page shows the seven key metrics used to assess the performance of your property portfolio.
Integrated Portfolio Metrics table.

Integrated Portfolio Metrics table showing Total Area Metro and Total Area Non-Metro.
Portfolio metrics graph
The portfolio metrics graph provides a high-level visual summary of your property portfolio. It consolidates key performance indicators into a single interactive view, enabling you to quickly assess the scale, efficiency, and cost profile of your leased space.
Key features
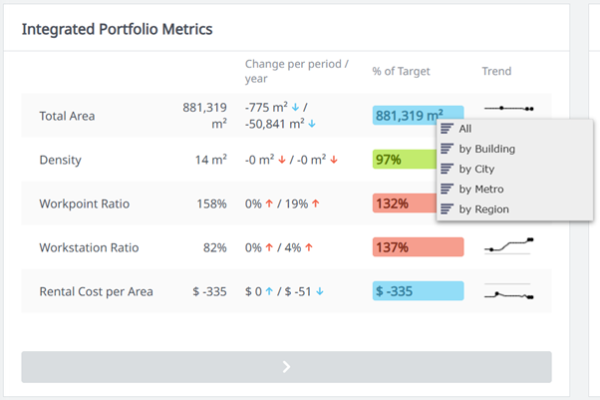
Drill-down capability – you can click or hover on metric elements to explore more detailed information, including building-level and lease-level data, where available.
Integrated Portfolio Metrics displaying five rows of key metrics.
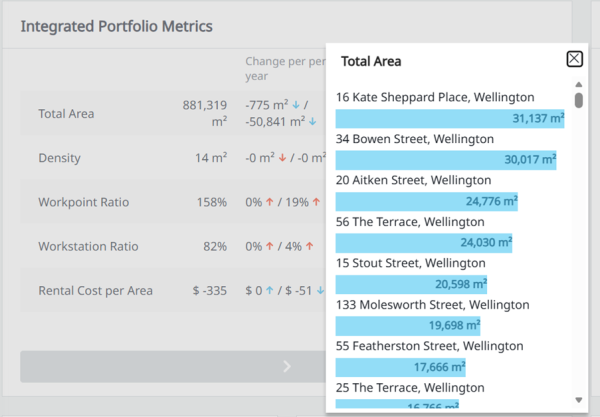
Expanded ‘Total Area’ view from the Integrated Portfolio Metrics table.
Active leases map
The Active Leases Map provides an interactive, visual way to explore your property portfolio. It enables you to quickly understand where assets are located and navigate directly to the information you need.
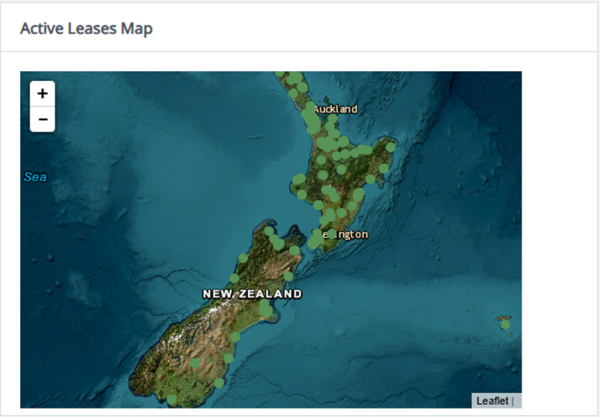
Active Leases Map showing New Zealand with green dots indicating active lease locations.
Key features
- Geographic visualisation of buildings – all active leased buildings are plotted on an interactive map, giving you an at-a-glance view of property distribution across regions.
- Interactive building selection – selecting a building marker reveals key details such as building name, address, and high-level property information.
- Drill down capability – from each building, you can access deeper layers of detail – including lease records, term dates, areas, rental amounts, and associated documents.
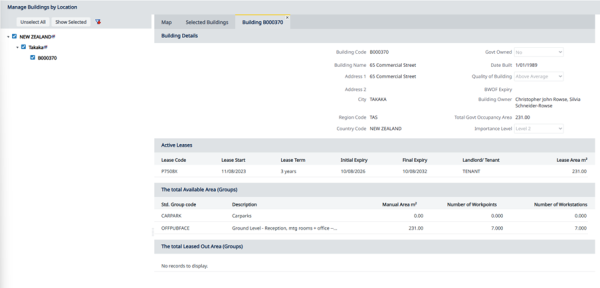
The Manage buildings by location page with a dropdown menu on the left.
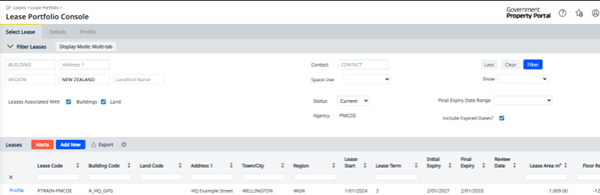
The Lease Portfolio Console showing lease filter options and a table listing a lease record.
The Portfolio tile
The portfolio tile provides quick access to the dashboards and modules you frequently use to manage and maintain your property portfolio. It features personalised shortcuts to easily navigate to key areas of the Portal without searching through menus.
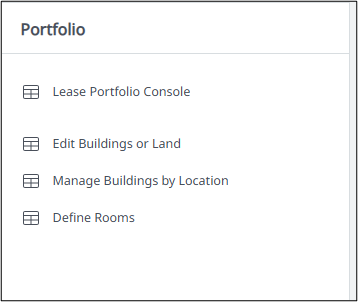
The Portfolio tile from the homepage.
The Reports tile
The reports tile provides quick access to the reports you frequently use to manage and maintain your property portfolio.
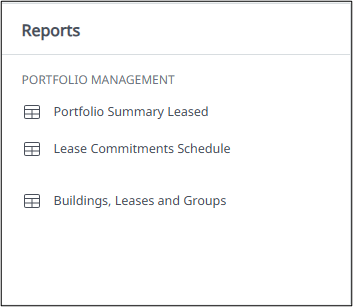
The Reports tile from the homepage.
The Alerts tile
The alerts tile provides a summary of key upcoming lease events within your property portfolio. It uses a traffic light (Red/Amber/Green) indicator system to help you quickly identify items that require immediate attention or are approaching key dates.
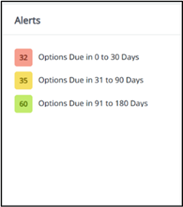
The Alerts tile from the homepage.
How to use the alerts tile
- Review the colour indicators to identify any items requiring immediate action. The alerts tile uses the following colour coding:
- Red – Lease event date due in 0 – 30 days. Indicates that the lease event is due within the next 30 days or is already overdue. This is the critical action stage, where immediate attention is required to prevent missed deadlines or compliance risks.
- Amber – Lease event due date in 31 - 90 days. Indicates that the event falls within an upcoming alert window and may require action soon. For renewals and expiries, this timeframe often overlaps with critical notice period thresholds, depending on lease terms.
- Green – Lease event due date in 91 - 180 days. Indicates upcoming lease expiries / renewals and rent reviews in your portfolio. This timeframe typically precedes the official notice period, meaning proactive planning should already be underway.
- Select an alert to view the relevant lease record and associated tasks.
- Update records as tasks progress to maintain accurate alert status information.
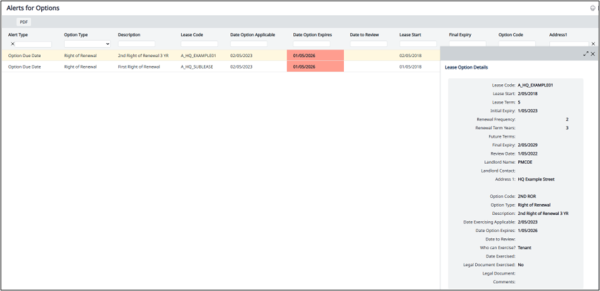
A table listing alerts for options.
Lease console
The lease console in the Portal is the central location for viewing, managing, and updating all information relating to your leases. It provides you with direct access to key data, workflow actions, and detailed lease records.
The lease console home page presents a full overview of your lease portfolio. It displays key information for each lease, including:
- location details
- initial lease terms
- lease expiry dates
- floor area (m²)
- annual rent.

Viewing a specific lease
When you select a specific lease from the portfolio list, the Portal offers two options for viewing lease information.
1. Details for lease
This view provides access to the full lease record, including all contractual, financial, and operational information.
From this page, users can:
• view complete lease details
• add, edit, or update lease information
• access related documents.
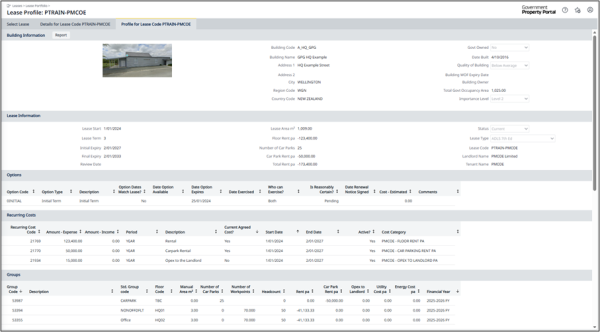
2. Profile for lease
This view presents a one-page summary of the lease. This view is designed for quick reference when you need an at-a-glance overview without navigating the full record.
Adding a new lease
When adding a new lease, you need to record the details of your lease, e.g. lease terms, costs, headcount, area and other important information.
How to add a new lease
- From the homepage, select ‘Lease Portfolio Console’ within the Portfolio section in the bottom right-hand corner. To add a new lease, click the ‘Add New’ button.
- To search for the Building or Land record the lease is associated with, click on the ellipses (three dots) that appear when you hover over the Building Code field. Find your Building or Land record from the list, then click the box next to the record and click ‘Save Selected’.
- Enter the lease information. Each lease must be linked to either a Building or a Land record (not both).
The following fields are mandatory:
- Lease Code: this must be a unique code of up to 16 characters. We recommend the following naming convention if you do not already have one within your agency.
- For Buildings use Pxxxx-000. The xxxx is a four-digit number that matches the building code and 000 is the agency acronym (e.g. P0398-PMCOE for B000398).
- For Land use Lxxxx-000. The xxxx is a four-digit number that matches the land code and 000 is the agency acronym (e.g. L1791-PMCOE for L001791).
- If there are multiple leases for a building or land record, add -01, -02, etc to the lease code.
- Lease Start: the date the current lease term starts.
- Final Expiry: the last possible end date of the lease, including all renewal terms.
- Agency: Select your agency acronym from the drop-down list in the Agency field.
Other information to enter
We recommend filling out as much information as possible to create a complete and useful record.
- Lease Term: how many years in the initial term of the lease.
- Initial Expiry: the date the initial lease term ends.
- Renewal Frequency: how many renewals you have for the lease.
- Renewal Term Years: how long each renewal is for.
- Future Terms: the future terms of the lease if they are uneven (e.g. 4 x 3 years + 1 year)
- Review Date: the date your lease will be reviewed.
- Date Move In: the date your Agency first moved into the location.
- Next Rent Review Type: how rent reviews are determined. Choose one of the types displayed.
- Ratchet Clause: refers to the types and method of any rent increase. This is specified in your lease.
- Lease Type: choose one of the types displayed.
- Lease Signed: automatically populates as ‘Yes’. If you are creating a proposed lease, you can choose ‘No’.
- Space Used: choose one of the options from the drop-down list to show how your agency is occupying the space.
- Landlord Name: You can enter a name manually or search using the ellipses (three dots) in blue that will appear when you hover over the field.
- Tenant Name: your agency’s full name (not the acronym). You can enter a name manually or search using the ellipses (three dots) in blue that will appear when you hover over the field.
- Parent lease: only applicable if the new lease is a sublease.
- Govt Reference Code: used to reference any internal coding convention.
- Comments: add any extra information you wish to capture against this lease.
Note: Select the appropriate building or land code from the drop-down list in the Building Code or Land Code field. If the required code is not listed, it means the location has not yet been created or assigned to your agency. Submit a request for the new location to be added by emailing GPP@gpo.govt.nz. Once the process is completed our team will email you to confirm availability.
Options
Options are time-sensitive reminders that you can use to manage your leases. We recommend that you create alerts using options for rent review, right of renewal and final expiry for each of your leases.
How to add an Option
To add a new option, select the relevant lease and choose ‘Add New’ from the Options tab. The ‘Add Option’ box will open and you can fill in the information as required. If you want to edit an existing option, go to your lease and click ‘Options’ in the top ribbon. Select the option you would like to edit, the ‘Edit Option’ box will open. Click ‘Save’ to save your edits.
Option Expires field
- Red: within 30 days of expiry of the option.
- Yellow: 90 – 30 days from expiry of the option.
- Green: 180 – 90 days from expiry of the option.
Information to enter when adding an Option
- Option Code: this must be a unique code of up to 16 characters.
- Option Type: select from the options that best describes your situation.
- Date Exercising Applicable: enter the date of when the option is due to commence.
- Date Option Expires: enter the date the option finishes.
- Date Exercised: enter the date when the option actually started.
- Date to Review: enter the date when your option will be reviewed.
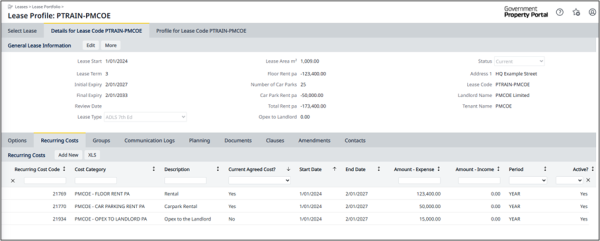
Recurring costs
Use the ‘Recurring Cost’ tab to enter a record of costs such as rent, utilities, and operating expenses relating to a lease you manage.
How to add a recurring cost
- Once you’re in your lease, click on the ‘Recurring Costs’ tab in the ribbon at the top of the screen.
- If you want to edit an existing cost, click on it and the ‘Edit Recurring Cost’ box will open. Click Save to save your edits.
- If you want to add a new cost, click ‘Add New’. The ‘Add Recurring Cost’ box will open and you can enter any new costs.
Note: Each of the following recurring costs must be entered on separate lines: annual rent, car park rent, and landlord opex.
Information to enter when adding a recurring cost
- Start and End dates: the floor rent and carpark rent costs should have a start and end date corresponding to lease events such as the Initial Lease term or the next Rent Review date.
- Cost Category: select from the options that best describes your cost.
For other costs such as opex to landlord, utilities and energy costs, they should have start and end dates corresponding to financial years.
Note: Carparks that are leased as part of the building lease should be separately recorded as a recurring cost, and then linked to a Carpark group to ensure costs are divided equally. If the carpark cost is included within the Floor Rent, you should only create a Carpark group to capture the ‘No. Carparks’ being leased.
- Amount – Expense: the full cost obligation to your landlord.
- Amount – Income: the income you receive from subleasing your space. Income should only be populated within a sublease.
- Period: you can capture your costs based over a yearly, quarterly or monthly period. All costs are apportioned and rolled up annually regardless of the period selected.
- Cost Dates Match Lease: this allows the Lease Start and Lease Final Expiry to automatically populate the Recurring Cost Start Date and End Date fields.
- Active: should be set to ‘Yes’ for your current active costs. Historical and future recurring costs should be set to ‘No’.
- Current Agreed Cost: should be set to ‘Yes’ for your current active costs. This will ensure the current costs are included in the calculation displayed on the General Lease Information section and within the Groups tab. All historical and future recurring costs should be set to ‘No’.
Recording other cost categories (other than floor, carpark rent and opex)
- Cost Categories can be defined within the Cost Administration module.
- As a default, cost categories for carpark rent, floor rent, energy, opex and utilities are created.
Groups
Use the Groups tab to record the types of space within the building such as office, non-office and public interface. You can also enter Manual Area m², Number of carparks, workstations and headcount.
How to create a new Group
- Once you’re in your lease, click on the ‘Groups’ tab.
- If you want to edit an existing Group, select it and the ‘Edit Group’ box will open. Click ‘Save’ to save your edits.
- If you want to add a new Group, click ‘Add New’. The ‘Add Group’ box will open, and you can fill in the information as required.
- Enter the information and select ‘Save’.
Information to enter when adding a Group
- Building Code: this field is auto-completed.
- Floor Code: is a mandatory field. Use ‘TBC’ if no other floor code is available.
- Manual Area m²: the exact area of the floor in square meters (m²). This information must be accurate to calculate a total figure within the Lease Area m² field located in the General Lease Information section.
- Number of carparks: how many carparks your agency is leasing. This field is only to be filled in when creating a ‘Carpark’ Group.
- Fit for Purpose: whether or not the space is fit for purpose (right for the kind of work being done there).
- Fit for Purpose Comments: add comments about your selection in the Fit for Purpose field.
- Number of Workstations: the number of workstations for undertaking desk-based activities and can either be assigned, or unassigned (e.g. flexible working environment). Workplace design guidelines
- Agency: the acronym of the agency. This field is auto-completed.
- Fitout Fixtures and Fittings: choose one of the options from the dropdown to indicate what is included in the lease (e.g. just the buildings, or are there extras like furniture, carpet, partitions, etc.).
- Description: enter any additional information you wish to capture regarding this Group.
- Std. Group Code: select from the options available that best fits how your space is used.
- For Office accommodation use the ‘Office’ codes, for operational use you can select a code that best fits your activity.
- You can capture ‘Carpark’, ‘Subleased’ and ‘Vacant’ space, or ‘NONOFFDFT’ for non-office space outside of the codes provided.
- If you don’t select a code from the dropdown list, then the system won’t be able to apportion the areas and link them with appropriate costs. This will result in areas not being included in KPI calculations.
- If you’re subleasing a portion of your area, you must record this information using the code ‘Subleased’. This will remove the subtenant's data from your reporting and provide more accurate occupancy information for your agency.
- Financial Year: this makes sure the information entered within the Groups form relates to the current financial year. If you leave the Financial Year field blank, the costs will not be apportioned to the associated groups, and the information will not roll up into the General Lease Information section. To find a Group created with no Financial Year you will need to scroll through the list of Groups within the Groups tab as these will be located at the bottom.
- Lease Code: this field is prepopulated.
- Headcount: the number of personnel whose primary places of work are within the net office area. Property definitions
Note: Land leases do not have Groups.
Communication logs
Use the Communication Logs tab to document written correspondence and verbal communication on a building or lease you manage, or to edit existing information.
Typical logs might include legal letters, tenants’ complaints, notes about conversations, phone calls, e-mails, and scans of documents.
How to add a Communication Log
- Once you’re in your lease, click on the ‘Communications’ tab.
- Click ‘Add New’. This will open the ‘Add New’ form where you can create a new communications record.
- Click ‘Edit’ if you just want to update communication details.
Note: Save any additions or edits before uploading documents. After uploading, you can view them using View Document (to the left of the record). You can only upload one file at a time.
Planning
Use the Planning tab to document your agency’s intended actions as they relate to the building or lease that you manage. This includes anything that needs to be added, changed or removed from the portfolio to support your agency’s workforce expectations and delivery of long-term goals.
- Once you’re in your lease, click on the ‘Planning’ tab.
- Click ‘Add New’ to open the ‘Add New’ form where you can create a new planning record.
- Click ‘Edit’ if you just want to update planning details.
- Any fields marked with an asterisk (*) must be filled out. Remember, it’s useful to include as much information as possible.
Note: You need to save any additions or edits to upload documents properly. Once documents have been uploaded, you can view them using ‘Show Document’ (to the right of the document field). You can only upload one file at a time.
Documents, clauses and amendments
Use the Documents, Clauses and Amendments tabs to upload any documents associated with your leases such as lease agreements, signatures of tenants and landlords, clauses to the deed and any amendments.
How to add a new document, clause or amendment
- Once you’re in your lease, click on the ‘Documents, Clauses or Amendments’ tab.
- Click the ‘Add New’ button, next to the ‘XLS’ button in the ribbon. This will open the ‘Add New’ form.
- Populate the information and select ‘Save’.
- If you want to edit an existing record, click on the document, clause or amendment you require within the related tab, update as required and click ‘Save’.
- In the Document field, click ‘Upload a document’. Choose the file you want to upload from your downloads or desktop. Then click ‘Save’.
Note: You need to save the form to upload documents properly. Once documents have been uploaded, you can view them using Show Document (to the right of the document field). Images (.jpg, .jpeg, .png) will be shown in the image viewer. To save the image displayed, use the browser function by right-clicking on the image and clicking ‘Save picture as’.
Contacts
Use the Contacts tab to view, edit, and add any contacts linked to a building, land, or lease.
How to add a contact
- In the left side Menu panel, select ‘Portfolio’, then select the ‘Background Data’ option. This will allow you to then select ‘Define Contacts’.
- Click the ‘Add New’ button in the top ribbon. This will open the ‘Add New’ form.
- Enter the information and click ‘Save’.
Information to enter when creating a contact
- Contact Code: we recommend the naming convention of [Last Name] [First Name] example being [DOEJOHN].
- Contact Type: select from the options available that describes your contact.
- Contact Status: defaults to ‘Current’
- Company: click on the ellipses (three dots) that appear when you hover over the field. Find your Company record from the list, then click the box next to the record and click ‘Save Selected’.
Assign a contact to a lease
- On the Portal homepage, select ‘Lease Portfolio Console’ within the Portfolio section.
- Open the required lease.
- Click the Contacts tab in the bottom ribbon.
- Click Assign.
- A contacts search box will appear where you can see all contacts.
- Find your contact from the list, then click the box next to the record and click ’Save Selected’.
Subleases
A sublease should be created if, as the lead tenant, you are renting a portion of your leased area.
Note: if you are the subleasing tenant, you’re required to record a standard lease.
How to create subleases
- On the Portal homepage, click on the ‘Leases’ option on the left-hand main menu, select ‘Lease Portfolio’ from the drop-down option.
- On the Lease Portfolio results options – select ‘Lease Portfolio Console’.
- To add a new sublease, click the ‘Add New’ button, to the right of the red ‘Alerts’ button on the leases ribbon.
- Enter the lease information. Each lease must be linked to either a Building or a Land record (not both).
- To search for the Building or Land record the lease is associated with, click on the ellipses (three dots) that appear when you hover over the field. Find your Building or Land record from the list, then click the box next to the record and click ‘Save Selected’.
Information to enter when creating a sublease
- Landlord/Tenant: select the Landlord option.
- Lease/Sublease: select ‘Sublease’ in the dropdown menu, this will make the Parent Lease field accessible.
- Parent Lease: click the ellipses (three dots) that appear when you hover over the field and choose the right lease code from the list.
- Lease Type: if you are subleasing or co-locating with another agency select the Memorandum of Understanding (MOU) option otherwise select the lease type applicable to the sublease.
Enter the rest of the information for the lease. Fields marked with an asterisk (*) must be filled out.
Creating Groups on a sublease
Groups created on a sublease must have the Standard Group Code selected as ‘Subleased’ and should align with the sublease group created within your head lease.
Creating Recurring Costs on a sublease
Your Recurring Cost should be recorded as Income within a sublease. This will allow you to report on your income received from subleased locations.
Creating additional floors
When a building record is first created, a placeholder known as a To Be Confirmed (TBC), is created. If you have multiple floors in the building or space you lease, you can create additional floor levels so you can designate groups to different floors.
How to create additional floors
- On the Portal homepage, select 'Define Rooms' within the Portfolio section.
- Find your building by entering its code in the Building Code field. If you don’t know the code, click on the ellipses (three dots) that appear when you hover over the field and choose the right code from the list.
- Click ‘Show’ at the top right corner of the page.
- Click on the triangle icon next to ‘No Site’ to the left of the screen. This will show you the floor codes listed for that building.
- Click Building Code or Name. If you don’t see the level you’re looking for, click the ‘Add New’ button in the ribbon to add the floor you want.
- Select ‘Floor’ from the dropdown list. This will open a new form.
- Enter the Floor Code and the Floor Name. Try to stick to a naming convention for clarity and consistency e.g. B for Basement, LG for Lower Ground, L01 for Level 1 and so forth.
- Once you’ve entered this information, click ‘Save’. Now you can see the new Floor Code under the building, and you can choose it when you’re adding a Floor Code to a Group within your lease.
Notional leases
Use Notional Leases when your agency owns the building. Notional Leases are important because:
- areas recorded in Notional Leases are included in the calculation of the total footprint and density
- they help to report an agency’s full portfolio, including owned properties.
Subleases can be created against Notional Leases for any areas within an owned building that are leased to other parties.
How to create a Notional Lease
- On the Portal homepage, click on ‘Lease Portfolio Console’ in the Portfolio bucket.
- To add a new lease, click the ‘Add New’ button, to the right of the ‘Select Lease’ page.
- To search for the Building or Land record the lease is associated with, click on the ellipses (three dots) that appear when you hover over the field. Find your Building or Land record from the list, then click the box next to the record and click ‘Save Selected’.
- Enter the lease information. Each lease must be linked to either a Building or a Land record (not both).
Note: If Building or Land information doesn’t autofill within the Building Code or Land Code fields, this means it doesn’t exist. You’ll need to submit a request for a new location to be added to your agency’s portfolio information. Our team will create the entry for you and email you once this is available.
Information to enter when creating a Notional Lease
- Lease Start: the date the building was purchased.
- Lease Term: Indefinite.
- Lease Expiry and Renewal Frequency fields: N/A.
- Final Expiry: this is a mandatory field, enter a future date e.g. 99 years from today.
- Next Rent Review Type: Other.
- Ratchet Clause: Unknown.
- Landlord Name and Tenant Name: Your agency’s name.
- Landlord/Tenant: Landlord.
- Lease Type: Notional.
- Lease Signed: Yes.
In the Planning Tab, ensure the Intended Tenure field is updated:
- Intended Tenure: Long (longer than 9 years).
- Next Planning Review Date: enter a future date e.g. 99 years from today.
Note: Use Groups to record the different areas within the building, including headcount and workstations. Recurring costs can also be used to record the opex to landlord, utility costs, and energy costs.